Archives for April 2011

Configuring WordPress


So WordPress is installed and you're all set on your WordPress theme. Now there are a few easy tweaks I would suggest to optimize your new site.

First, login to your site and click “Settings” on the navigation bar on the left.

In the “General” area for “Settings”, there are two places to update: Site Title and Tagline.

General Settings in WordPress

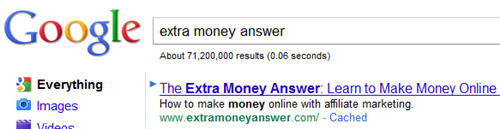
The Site Title is the information Google will list when your site is indexed. For instance, I currently have “The Extra Money Answer: Learn to Make Money Online” as my site title.

And the Tagline will be some supplementary information to describe your site. My Tagline is “How to make money online with affiliate marketing”.

Here is how you would see this site in Google…

Extra Money Answer in Google

There is other information you can change on your General Settings page, such as your Timezone, Time Format and Date Format. This is not hugely important, but go ahead and customize that to your Timezone and time and date preferences.

Next, click on “Reading” in the “Settings” area, and for “For each article in a feed, show”, select “Full text” and then click “Save Changes”.

Reading Settings in WordPress

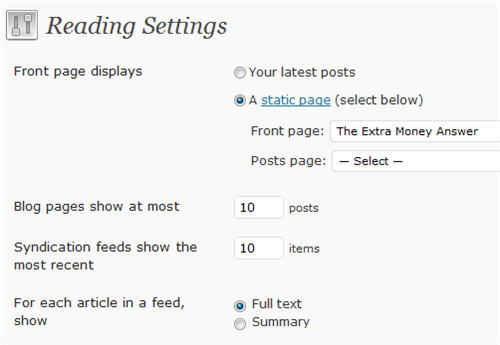
The purpose for this is so when somebody follows your blog through an RSS reader, they see your full posts. In my opinion, it's best to get people to read you where they prefer, rather than trying to force them back to your site each time.

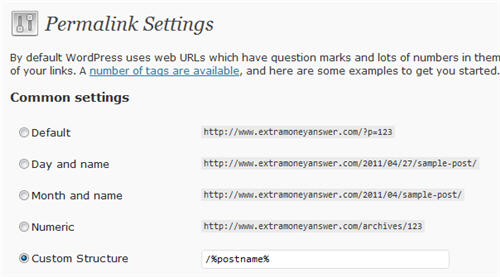
The last thing to change in the Settings area is the “Permalink Settings”.

The determines how the links from your site will look, and there are a handful of options to choose on that page.

My preference is to have the words from each post title in the link from each post, which is a custom setting. This makes it clear to search engines what each post is about.

Select “Custom Structure” and enter the following into the field: /%postname%

Then click “Save Changes”.

Permalink Settings in WordPress

There are lots of other changes you can make to customize your blog, but these are the tweaks I always make right away when I launch a new site.

Next up, I'll share the plugins I use in WordPress. Plugins are tools that you can easily add to your blog to add more functionality.

Installing a WordPress Theme


The theme of a WordPress blog is the design for your site, and it's really easy to change the look and feel in a matter of clicks.

By default, your WordPress theme is a free theme called Twenty Ten. If you're happy with the way this looks, you can just stick with it.

Default WordPress homepage

If you would like to explore other themes, there are many free WordPress themes, as well as a selection of premium (paid) themes.

My favorite is the Thesis WordPress Theme, which was created with a focus on SEO (search engine optimization), so you can get your site listed in Google well, plus a lot of flexibility on the design, and fast loading time.

Thesis theme for WordPress

Extra Money Answer, my affiliate blog, and the Affiliate Summit site are all using the Thesis theme.

If you like the design of a particular blog, scroll down to the bottom and you will typically see an indication of which theme they are using.

Which WordPress theme powers this blog?

For instance, if you look at the bottom of this page, you will see “Built on Thesis by Matt” – my site uses Thesis and it was customized by a guy named Matt Gross of http://thesistutor.com/.

Anyhow, if you'd like to change your WordPress theme, login to WordPress and click “Appearance” from the menu on the left.

WordPress appearance section in admin

You will then see which theme is currently active, as well as any other themes you can activate.

Click the “Install Themes” tab if you'd like to search for free themes by keyword, author, or tag.

Install Themes in WordPress

For instance, if you would like a WordPress theme that has a magazine look to it, you could search for the term “magazine”.

Search for a WordPress theme

If you see one you like, click “Install” for that theme, and a box will pop up with the option to “Install Now” – go ahead and click that box. You are just installing the theme to your account. It will not go live on your blog.

Select a WordPress theme to install

And it's that easy. The new WordPress theme is installed for you.

WordPress theme is installed

You can then preview how the new theme would look with your current content, as well as activate the theme, or return to the theme installer to search for more themes.

This is the preview of Extra Money Answer with the Magazine Basic theme. I will stick with the Thesis Theme.

Preview the new WordPress theme

When I go back to the “Manage Themes” tab, I still have Thesis as my current theme, but now Magazine Basic has been added to Twenty Ten as a theme I could choose to activate if I wanted to change themes.

New theme in Manage Themes

Now, if you were to buy a premium theme like Thesis, you would typically download it from the site where you purchased it.

Then you would go to the “Install Themes” tab and click “Upload”. Then you would click “Choose File” to find the file on your hard drive and upload it to WordPress.

Upload a WordPress theme

After uploading a theme, you can then preview how that theme would look with your current content, as well as activate the theme, or return to the theme installer.

One thing I love about WordPress themes is that you can switch them out so quick and easy if you decide you don't like one anymore.

The next step is to make some adjustments to customize WordPress.

Installing WordPress


WordPress is my content management system of choice, as it is easy to use, learn, and scale.

Additionally, Blue Host enables it to be installed at the push of a button.

Now that your hosting account is all set, go ahead and login to get WordPress installed.

This will bring you to your cPanel, which is short for control panel.

Then scroll down to the Software/Services area, and click the WordPress icon with the big, white W.

Blue Host cPanel

Next, click the left “Install” button for a brand new version of WordPress.

Click to install WordPress on Blue Host

After this page, you'll see three steps for Installation Preferences, Advanced Options, and Legal Information. There is no need to change anything here. Just check the agreement box and then click the “Complete” button.

Final steps to install WordPress on Blue Host

Next, you will see that the installation process is underway. Your login url is there, which is your domain and then /wp-admin, as well as your user name (admin) and password.

WordPress is installing on Blue Host

You will also get this information in an email.

WordPress access information via email

Check your domain and you should see the default version of WordPress installed.

Default WordPress homepage

Next, we will change install a WordPress theme.

Connecting Your Domain to Your Host


You will have to make a quick and easy change in your GoDaddy account to connect your domain name to your hosting account on Blue Host.

Login over at GoDaddy and keep stay logged in at Blue Host.

After logging into GoDaddy, go to the Domain Manager section, and then click your domain name.

There is a lot of stuff you don't have to worry about there – just hover over the icon that says Nameservers and click “Set Nameservers”.

Domain Manager on GoDaddy

This page will have two fields, Nameserver 1 and Nameserver 2, that already have information in them. You will be replacing this with information from Blue Host.

Default nameservers on GoDaddy

At this point, go back to Blue Host and click on the Domain Manager tab and select the box next to your domain.

Domain Manager on Blue Host

The next page will show the information you need to enter into GoDaddy for your two nameservers.

Nameservers on Blue Host

The nameservers for me were ns1.bluehost.com and ns2.bluehost.com. Yours may be different.

This nameserver information at Blue Host will be entered over at the Set Nameservers area on GoDaddy. Just copy and paste your information from Blue Host to GoDaddy and click OK.

Set Nameservers from Blue Host at GoDaddy

Your hosting account will be connected to your domain name pretty soon. Sometimes it happens in a matter of minutes – other times it will take hours or more.

Your nameservers have been set.

The next step is to install WordPress on your hosting account.

Setting Up Your Hosting Plan


The signup process with Blue Host is straightforward. When you go to the homepage, just click on the green “Sign Up Now” button to start.

Blue Host

Next, you are going to enter your new domain name in the field below where it says “I Have a Domain Name” and click the blue “Next” button.

I've entered extramoneyanswer.com where you should put your domain name.

Enter your domain at Blue Host

The next page will ask for your basic contact information. That page will also try to sell you other domain name extensions if they are available. Ignore that part.

I would suggest going with the 12-month package for now – you don't save much by committing to 24-months.

Also enter your credit card information and click the blue “Next” button.

Provide your contact information to Blue Host

You're almost done at this point – a confirmation will hit your email very soon.

Click on the “Create your password” link to set up your password for the account.

You've purchased your hosting account

This is where you will enter your password in two times and then click “Change Password” to make it something you can remember, instead of the default password.

Blue Host provides some good tips for setting up a password.

In short, use something with both letters and numbers, and have one or more of the letters capitalized. I like to also throw in some punctuation marks, or as they refer to as “special characters”.

Choose your Blue Host password

Now you just have to re-login with your new password.

Login at Blue Host with your new password

Our next step will be to connect your domain to your new hosting account.

Website Hosting


Now that you've registered a domain, it is time to set up hosting for your site.

The host is where your site will live. Just as I used GoDaddy as my example for a domain registrar, I will show you how to set up hosting with Blue Host, which is the company I used to host this site.

Blue Host

I am going to take you through six steps here:

It's all pretty easy – just a matter of clicking, copying, and pasting. And then, before you know it, you'll have a live site.

Register a Domain Name


Once you have found a domain you like that is also available, it is time to register that domain.

Even if the domain name is available now, it might be gone in an hour, so don't put it off.

I will go through the process of registering a domain at GoDaddy, as I did with extramoneyanswer.com.

Note that this is how it was when I did it, but they may change the process down the road. Also, I already have an account, so some of my information is already in their system.

Create an account at GoDaddy first.

Register a domain at GoDaddy

After I did a search for the domain, GoDaddy indicated that it was available, so I clicked the green “Add” button to register it.

Available domain

GoDaddy will then give you the option to register the same domain name with other domain extensions, like .net and .biz. Resist the temptation.

Just click the orange “Continue to Registration” button.

Additional domain options

Then you'll get another option to register addition versions of the domain. Go ahead and click the orange “No Thanks” button.

Skip alternate domains

The next page offers some other bells and whistles you don't need – just continue past that one, too.

You don't need this stuff

Now you should see your shopping cart. Double-check that the only thing in there is the domain name you want to buy.

Then click the “Continue to Checkout” button.

Your domain shopping cart

The final step is to add your billing information, and then click the orange “Place Order Now” button.

Buy your domain

Now you own your domain. Congratulations.

Next up, you will need to set up a hosting account, which is the place where your site will live.

Brainstorm a Domain Name


So you have a topic for your site and some ideas on how to create content. Now it's time to register a domain.

I am going to show you how to do it with GoDaddy, which is the domain registrar I use.

GoDaddy

There are many domain registrars out there, and the registration process will be similar, but a little different if you go with another one.

Anyhow, before you register a domain, you will have to find one that is available.

I'd encourage you to spend no more than 20 minutes deciding on the domain you will register.

Don't sit and write out 25 ideas for domains, because most, if not all of them, are already gone.

So, try going to GoDaddy or the domain registrar of your choice and start plugging in potential names for your site.

Two bits of advice on selecting the right name…

  1. Get a .com name. Don't consider anything else. .com is the standard.
  2. Don't use hyphens. Your name should be easy to remember.

So let's get to registering that domain.

Google Alerts as a Content Source


In addition to using questions you receive from people to generate content, Google Alerts are also a good content source.

Google Alerts

Google Alerts are emails that let you know when there are news items, blog posts, videos, etc. on a certain topic.

What you do is go to www.google.com/alerts and enter search terms (words and phrases related to the topic of your site) you'd like to track.

There are some options to choose when setting up an alert.

The alert “Type” default is “Everything”, which will provide you alerts from news, blogs, realtime, video, and discussions.

“How often” enables you to choose to receive alerts as it happens, once a day, or once a week.

“Volume” gives the choice of only the best results and all results.

I typically go with all types of alerts, once a day, and only the best results.

As I receive the alerts, I will go through them and check whether any of them are targeted and interesting enough to report on with my own commentary.

In addition to providing a constant flow of content, Google Alerts also enable you to expose your audience to breaking news, as well as new and unique resources, tips, and ideas.

But I'm getting ahead of myself here. You need to get a domain and hosting for your site before you start creating content.